Restoring an Antique Chest

Who doesn't appreciate stumbling upon a lovely antique or uncovering a diamond in the rough? Personally, I hold a special fondness for these treasures, likely due to my upbringing surrounded by such timeless pieces. Both my grandparents and my mother share a deep affinity for antiques, recognizing and valuing their beauty, uniqueness, and rich histories. I have fond memories of accompanying them to antique shops on leisurely weekend afternoons, whenever the urge to explore these gems struck them.
It's amusing to reminisce about how all three individuals generally shared similar preferences, yet each had their unique tastes. Grandma, for example, had a fondness for blending country pieces with fancier elements. In contrast, Mom leaned towards a more primitive style in her decor choices. Grandpa, on the other hand, had a deep appreciation for anything related to farming, particularly old metal signs. His passion led to the accumulation of numerous signs over the years. Upon their retirement and the sale of their home, Grandpa reached out to Cracker Barrel and successfully sold his entire collection to them, along with various other mementos. It's fascinating to learn that Cracker Barrel has a dedicated division at its headquarters that specializes in acquiring such vintage pieces for the adornment of new stores under construction.
The chest I restored for Mom was bought in southern Indiana on a fall antique outing. Over the years, her pets had done a real number on it. So, during Covid, I had extra time on my hands and asked if she would mind if I gave it a refinishing try. With her ok, I got to work.

You can see how the original stain was fading and how the kitties had used it as a scratching pad!
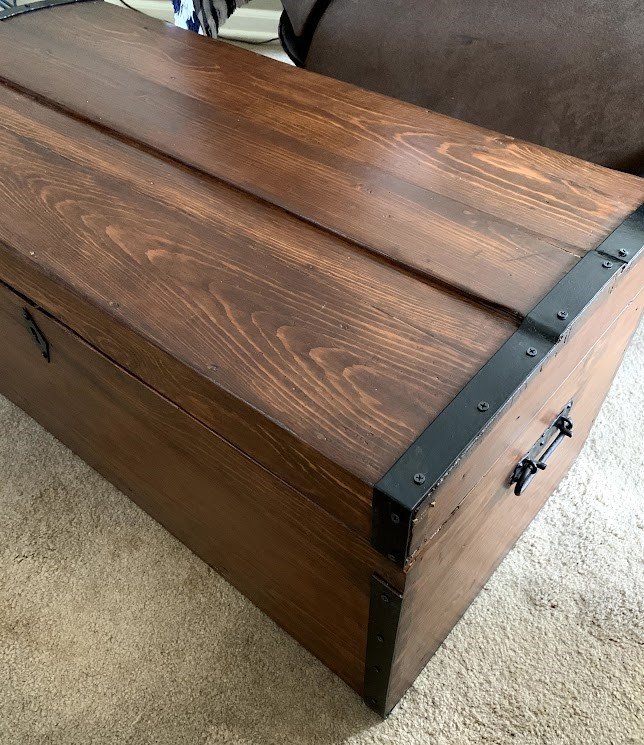
Originally, I was going to sand it down and put a new stain on it. However, I couldn’t resist taking off the metal straps around the edges. They had some rust spots and were pulling away from the wood. After removing the straps, I cleaned them up and gave them two coats of black satin spray paint.
Another issue I decided to tackle was the large split in the wood on the top of the lid. While I did fill most of it in, I chose not to completely fill it in. I like the added character it gave, and as can be seen in the final result, I left it.
There were a lot of passes with the sander, and I went from 80 grit all the way to 220 grit to get the feel I wanted. This also eliminated all of the scratches while leaving many of the deeper “ding” marks, again adding to its character and uniqueness.
One final step before staining was to precondition the wood. The wood was very dry, so this step not only gave the wood some much-needed moisture but also helped ensure a better coat of stain. Well, the ensuring a better stain coat didn’t quite happen as I rushed this step. However, we both liked the grain in the final product. I must say, I was proud of myself when this was completed!